Case People & Relationships
Overview
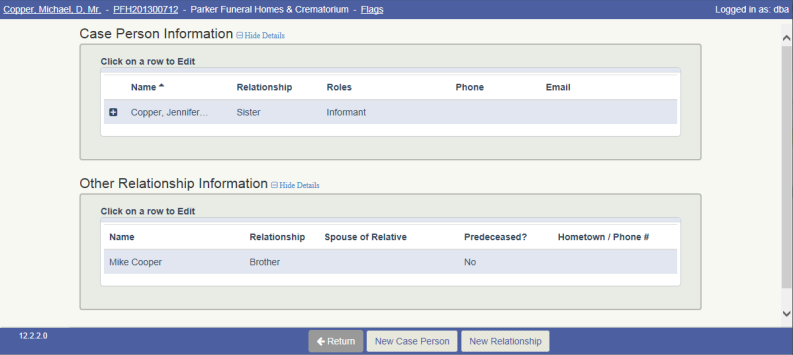
The Case People & Relationships screen is used to associate any person involved with a case (purchaser, spouse, next of kin, etc.) with the selected case number.
This screen can be accessed from the Menu bar by navigating to Cases – Case People & Relationships.
The 2 main functions of the Case People & Relationships screen are:
- To add “Case People” to a case. Case People are important people (purchaser, next of kin, spouse, etc.) for which you want to capture detailed name information, such as address and phone information. Case People are added to the names database. These people can be searched for and used in the future. For example, you can send a mailing to anyone that has been added as a case person.
- To record other names relevant to a particular case. These names are recorded as “Other Relationships”. Detailed information is not captured for these names as having that data is not important for your business. For example, you might record a cousin that lives out of town as an “Other Relationship” name, or a deceased relative.
You can make any person (or company) a case person. The case person name must exist in the database, therefore, all names including the decedent, must be added to the database before they can be associated. Using the ‘New Case Person’ button on the footer, you can search for an existing name in the database, or, create a new name if the name you are entering does not already exist
Case People can be added on many other screens in MIS Professional. For example, the “Caller” name can be added on the First Call screen. All case people added on other screens will automatically carry over to this screen.
All Case People must have a “Relationship” defined. This Relationship field records the relationship of the case person to the decedent (or beneficiary if the case you are working with is a pre-need). Case People can also have a “Role” defined. Typical roles are “Purchaser”, “Caller”, “Next of Kin”, “Spouse”, etc. A case person can have many roles. For example, a case person can be both a “Spouse”, “Next of Kin” and “Caller”.
Again, while “case people” are added as names to the database, “other relationships” are names that you want to capture but are not significant enough to include them in the names database. (You can send a mailing to a Case Person but not to names recorded as an “Other Relationship”.
Note that different Names can have the same relationship of Mother, Father or Spouse within a Case, however, only one name can have the ROLE of Mother, Father or Spouse associated to it. The ROLE will be associated to the name which was last saved on screen with that relationship.
Work flow
To add a New Case Person :
- Navigate to the Cases – Case People & Relationships screen
- Click on the ‘New Case Person’ button
- Search for an existing name or create a new name
- Select a Relationship (as the person relates to the decedent)
- Select all Roles that apply to the name (as the person relates to the case)
- Click Save
To Edit an existing Case Person:
- Navigate to the Cases – Case People & Relationships screen
- Select the name you wish to edit
- Click on the pencil icon (edit icon)
- Edit the Name details as desired and click save
- Change any Relationship values needed
- Change any Roles needed
- Click Save
To Delete a Case Person:
- Navigate to the Cases – Case People & Relationships screen
- Click on the Case Person you wish to remove
- Click on the DELETE button
- When prompted, click on REMOVE to delete
- The name has been removed from the case (not removed from the database)
To Copy the Address from Another Case Person:
- When adding new or editing an existing Case Person, open the Name Maintenance screen. An Envelope icon will appear above the Primary Address field.
- Click the Envelope, the Copy Address screen opens. It lists the case people on the case
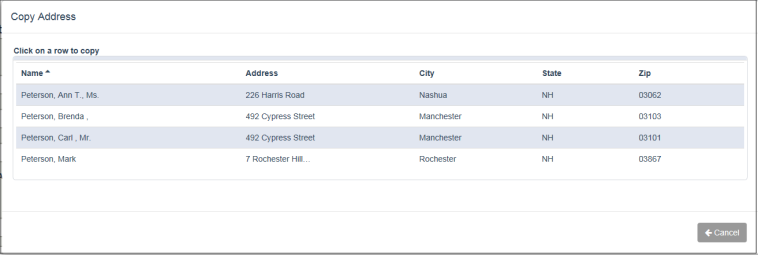
- Select the address that you want to copy to the name you are working with; the address is copied to your name
Other Relationship Information
To add a new Other Relationship:
- Navigate to Cases – Case People & Relationships
- Click the ‘New Relationship’ button located on the footer of the screen.
- Fill in the desired information
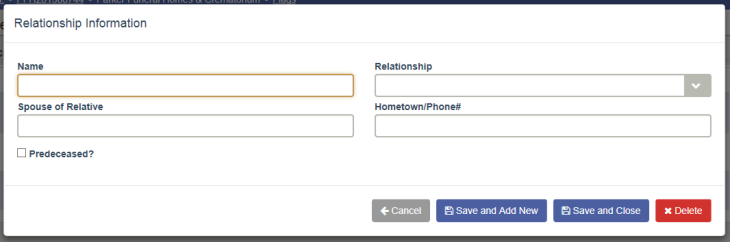
- To add further names: Click the "Save and Add New" button, otherwise click the "Save and Close" button if done adding names.
- The Cancel button cancels all changes without saving
- The Delete button deletes the name from the relationships
- Note that when entering a name, enter the name as you would want it to show on a document,
- For Example: "John E. Smith" - (First Name, Middle Name, Last Name)
Sort Order
The names in the Other Relationship Information section are displayed in the order created.
Note: The order used is based on the Create Time in the Cafe Arrangement Survivor Table
Important Notes:
- You cannot remove a case person that has a role of PURCHASER if a Posted contract exists for the case.
-
If you assign a case person a relationship of spouse, mother, or father, the same “role” is automatically assigned to the name.